Replacement of the factory Meridian audio system in the Range Rover Velar


This car came to us from Odessa. It all started with a phone call from the owner, in which he told about the terrible standard sound in his Range Rover Velar and that it is almost impossible to find people capable of a high-quality upgrade of the factory audio system in such a car in Ukraine.

Well, I partly agree, at least with the fact that the factory sound needs to be changed, because no matter what standard audio system I listen to, it’s always sad. No, if you don’t compare, you might even think that everything is ok with the sound in the Velar. But God forbid you listen to a really good system))
The most difficult thing here is people’s opinion, which is divided into two camps – the first believes that good sound is very, very expensive, the second believes that you can fit it into a thousand or two $$ and it will be magical. But our experience shows that good is somewhere in the middle. The budget for replacing the top factory Meridian in the Range Rover Velar, by the way, was about $6,000, and as a result we got a system an order of magnitude higher than the premium Meridian.


About the composition of the new audio system. This was the first case in our practice when the configuration was not ours. The car owner studied everything himself, chose one of the works of our Russian colleagues and asked us to do the same in his car. We studied all the components and decided that there were no objections from our side – all the components are worthy, and some were interesting for us from the point of view of listening to them in the car – for example, the top tweeter Helix and the middle Brax – you don’t listen to them every day in real field conditions)

The configuration of the new audio system turned out to be classic – a three-band front with channel amplification and a subwoofer. As usual, they went for a reduction in the number of speakers for the sake of a significant increase in the quality of the sound picture. So, what was installed in the Range Rover Velar instead of Meridian:
- The source is the factory head unit/amplifier, but the JL Audio FIX-82 will work with the signal. Read about this device below.
- Helix P Six DSP MK2 processor. This is a processor with a built-in six-channel amplifier. All six channels were given to the front speakers.
- The speakers turned out to be a hodgepodge, I am usually against such things, but here all the participants are outstanding – it was worth taking a risk. The midbass was taken from the Focal P 165 FE set, the midrange is the top-end Brax ML3, the tweeter is the top-end Helix C1T.
- Subwoofer JL Audio 10TW3
- Amplifier – monoblock JL Audio JX1000/1D
- Audio preparation of doors and high-quality accessories for connection are a must!
Work began simultaneously in two directions – manufacturing a stealth case for the subwoofer and installing/connecting the speakers, and then the amplifiers with the processor.

ACOUSTICS for RANGE ROVER VELAR
All six new speakers were installed, of course, in the standard places. Hidden installation, no alterations – as always within the framework of our philosophy that good sound is possible without damaging the car and not for all the money in the world.
Traditional review of standard speakers – want to see “premium” speakers according to Range Rover? And “premium” door preparation for “premium” sound? Take a look:


Factory middles (this is what cheap Chinese Mysteries usually look like):


Bare, untreated metal doors are the norm for absolutely all new cars, but for the Range Rover with premium sound to have the same thing – well, I don’t know…
Standard view of the front door card (it has a midrange speaker built into it, by the way, which works for the entire volume between the inner part of the panel and the door card – we did it better – we made small-volume housings for the middle ones, more on that below)

Focal midbass speakers were installed in the previously prepared doors. The audio preparation is standard, quite sufficient for Focal Flax midbass speakers – a layer of vibration insulation on the outer door panel, a layer of vibration insulation on the inner surface of the door, partial vibration insulation of the door card plastic and a layer of noise absorber there too.


The regular place for the new midbass was slightly modified using ready-made CARAV spacer rings. It was important to keep the height of the podium and we kept it:


They didn’t do much beauty – for hidden installation, in my opinion, functionality, reliability and manufacturing speed are important. All three components are present in this case.
As I mentioned above, for the midrange Brax Matrix ML3 (this is the top line) additional small-volume enclosures were made – this way the midrange frequencies will be revealed in the best possible way.


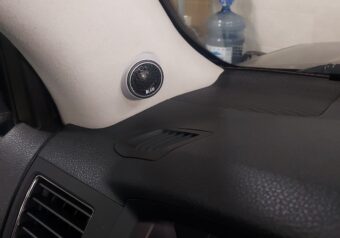
The Helix C 1T tweeters were the easiest to install – in the standard location with minor modifications to the stands and for the standard grille:


Basically, it’s all about the speakers that will work instead of the factory Meridian Surround audio system – we replaced only the front with outstanding components and this served as a guarantee of an excellent final result!
INSTALLING A PROCESSOR WITH AMPLIFIER
We were faced with the task of discreetly placing three devices in the Range Rover Velar – a processor with an amplifier Helix P Six DSP (amplifier power – 6 channels of 120 W), a JL Audio monoblock for the subwoofer and an integrator JL Audio Fix82. All three devices are compact, we placed them under the front seats.
The JL Audio integrator was placed next to the factory amplifier. The factory amplifier in this car had to be left – the signal was taken from it. If, for example, in the Lexus LX450D, where we replaced the premium Mark Levinson, we simply threw out the factory amplifier and took a clean signal from the head unit using a ready-made solution, then for the Velar there is no such solution yet and we worked with the signal that we took from the factory amplifier, and there are time delays, and a cut frequency response with all the ensuing.
What is this JL Audio Fix-82? It is a digital audio processor for restoring audio signal from the factory (OEM) audio system, with 8-channel analog input, digital output and 2-channel analog stereo output.
Here is some information (taken from the ThernovAudio website) – the signal at the output of a standard audio system often contains pre-emphasis: an incomplete frequency spectrum in different channels, uneven frequency response, phase shifts and time delays in individual channels, which together form comb filter distortions (Comb Filter Distortion). With FiX™, audio signals from different channels are automatically converted to the most complete frequency spectrum with a flat frequency response and elimination of time delays. A powerful 24-bit processor and a carefully developed algorithm are used for this. The resulting signal can then be fed to the input of a power amplifier or a separate audio processor for sound adjustment.
In general, in my own words – we managed to work as much as possible on the crooked signal from the factory amplifier and get the most correct signal possible in this case.


And this is probably the most interesting thing – below is a screenshot from the JL Audio Fix82 setup program. What do we see? We see that the factory amplifier has cut the frequency response, and the frequency response itself is far from ideal. The green “mountain” is the frequency of the standard midbass, the red “mountain” is the midrange, and the violet is the tweeter. The orange stripe is the signal collected in one wide band. It was this smooth signal that we sent through optics from JL Audio Fix-82 to the Helix processor. It was this combination that allowed us to get a good final result, because without it, not a single best amplifier or speakers could make the sound of the Range Rover Velar better…

We’ll ensure unrivaled sound quality for your car. Rely on the professionalism and experience of our specialists!
The processor and monoblock were placed under the other front seat. As you understand, the two-in-one solution helps us save space, installation time, and money. With the help of the processor with the six-channel Helix P Six DSP amplifier, we were able to fine-tune the audio system, and six powerful channels gave us the opportunity to implement a full, decent front amplification per channel.


MANUFACTURING, INSTALLING AND CONNECTING A SUBWOOFER
We had to work a long time with the subwoofer. The whole project took us 10 working days and the main reason for such a long period is the production of the stealth enclosure in the rear wing. Without the subwoofer in such a case, the project period would have been reduced by 2-2.5 times – to 3-5 days.
But we initially discussed the subwoofer enclosure exactly like this, we got hung up on the wall thickness, how many layers of fiberglass in the end no one knows, but the wall thickness is about 15 mm! This is important when a powerful and musical subwoofer is assumed.
So here’s the whole process:


The task was to preserve the factory functionality in the trunk (opening/closing the false floor, for example). To do this, it was necessary to completely recess the subwoofer speaker into the housing:


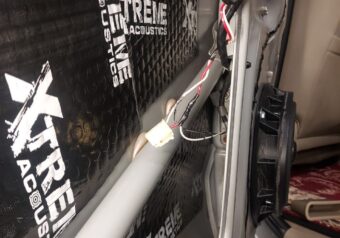
It was also important to securely fasten the body, which turned out to be quite heavy. We used the standard studs:


Intermediate fitting of the stealth body in the rear left wing of the Range Rover Velar:


The final result turned out to be frankly good in my opinion, judge for yourself:


The final setup of the processor took a decent amount of time, an evening and almost a full day, because we tried to squeeze out the maximum. In the end, we succeeded!